Printer Bookshelf Setup: Organize and Protect Your Printer
Learn how to safely place a printer on a bookshelf, turning clutter into a compact, accessible workstation. This guide covers shelf selection, space planning, ventilation, cable management, and routine maintenance for longevity.

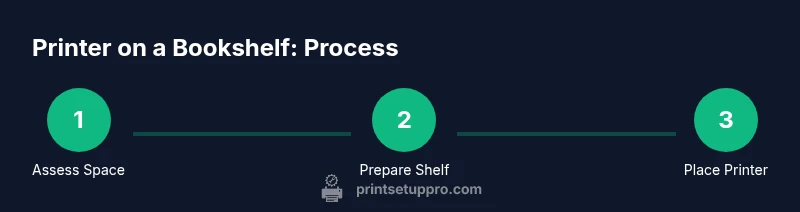
This article shows you how to set up a printer on a bookshelf, creating a compact workspace that keeps cables neat and improves access to print controls. You'll learn how to choose a shelf, prepare the space, mount or place the printer, manage power, and maintain the setup for longevity.
Why a Printer Bookshelf Matters
A printer bookshelf is more than a space saver; it’s a smart way to declutter your workstation and keep essential tools within arm’s reach. When you design a dedicated shelf for your printer, you reduce desk clutter, simplify ink and paper management, and create a predictable print workflow. Having a stable, accessible surface also makes loading media and clearing jams faster. According to Print Setup Pro, a printer bookshelf setup can improve airflow around the unit and reduce heat buildup, which helps maintain print quality over time.
Planning Your Printer Bookshelf Setup
Before you buy or reposition furniture, map out your space. Print Setup Pro analysis shows that careful space planning reduces the time you spend adjusting the setup and helps maintain consistent print quality. Measure your printer’s width, depth, and height, then compare those numbers to the shelf depth and available vertical clearance. Plan for at least 2–3 inches of clearance above the printer for ventilation and 1 inch on each side for cable routing. Consider how you’ll access the control panel, open paper trays, and replace ink or toner. This stage helps prevent awkward fits and repeated rearrangements.
Choosing the Right Bookshelf and Accessories
Look for a bookshelf with sturdy, adjustable shelves and a weight rating that comfortably exceeds the printer’s weight plus a buffer for paper, ink, and accessories. Use anti-vibration mats or felt feet to minimize movement during printing, and add a dust cover when the area isn’t in use. Cable management clips, Velcro straps, and a short power strip with surge protection keep cords orderly and reduce tripping hazards. These accessories make maintenance easier and protect the printer from accidental knocks.
Preparing the Space and Ventilation
Ventilation is critical for printers because heat and dust can affect performance over time. Leave at least 2–3 inches of clearance above the printer and ensure air can circulate around the sides. Avoid placing the setup near heat sources, direct sunlight, or damp areas. If your room gets dusty, consider a hinged dust cover or a small air purifier nearby to minimize debris that could enter the printer’s intake.
Mounting and Positioning the Printer
If your shelf has a fixed surface, you may place the printer directly on it after adding non-slip feet or a thin mat. For heavier printers or noisy models, position a dedicated printer stand or a stable panel between the printer and the shelf to reduce resonance. Align the printer so access to the paper tray and control panel is convenient, and ensure the power cord can reach the outlet without stretching. A level surface reduces vibration during print operations.
Managing Cables and Power
Plan cable routes before powering on. Use short, color-coded cables to simplify maintenance, and secure them with cable clips along the back of the shelf. Plug the printer and its computer or network gear into a surge-protected outlet strip to guard against brownouts. Leave enough slack behind the printer to avoid pinching, and avoid routing cables across shelving edges where they could catch on clothing or objects. Regularly inspect connections for wear.
Loading Paper and Setting Print Parameters
Place a fresh stack of paper in the tray, ensuring the paper size matches your print settings. Check the printer’s alignment guides and run a test page to confirm margins and color calibration. If you print frequently, consider dedicating a narrow, easily accessible shelf area for paper reloading and media types. Keep manuals and spare cartridges in a labeled bin within reach.
Testing and Troubleshooting Common Issues
Run a test page after setup to verify alignment, margins, and color. If you notice skewed prints, check paper alignment, tray guides, and the printer’s internal calibration. Listen for unusual noises—these can indicate loose panels or misaligned rollers. Document recurring issues and consult the interval maintenance plan to address wear before it becomes a bigger problem.
Maintenance Routine and Longevity
Dust and debris are printer enemies. Create a simple weekly routine to wipe surfaces, check vents for obstructions, and verify cable integrity. Every few months, reseat connectors, update firmware, and inspect power supplies. A regular checklist reduces the chance of misfeeds and jams, and helps extend the life of your printer bookshelf setup.
Common Mistakes to Avoid
Avoid overloading shelves or constraining ventilation with dense stacks. Don’t route cables across edge gaps where they can snag or be pinched. Never place a printer directly on rough wooden surfaces without a protective pad, and never block vents with boxes or paper. The Print Setup Pro team recommends reviewing your setup annually to maintain performance.
Tools & Materials
- Sturdy bookshelf with adequate clearance(Weight capacity per shelf should exceed printer weight by a safe margin)
- Anti-vibration mat or rubber feet(Reduces movement and noise during printing)
- Measuring tape(To verify space and clearance)
- Level(Ensure a perfectly flat mounting surface)
- Cable management clips or Velcro ties(Keep cords organized and out of the way)
- Power strip with surge protection(Protect against power surges and provide a single outlet)
- Dust cover or printer cover(Optional for long idle periods)
- Screwdriver set (hand tools)(Useful if mounting to a panel or stand)
- Printer manual / quick-start guide(Keep for reference and firmware checks)
Steps
Estimated time: 60-90 minutes
- 1
Assess space and choose the shelf
Measure your printer and verify the shelf depth and height. Confirm there’s adequate clearance for vents and trays, and ensure the shelf can bear the printer’s weight with a margin for paper and accessories.
Tip: Write down key dimensions and write them on the space where you plan to set the setup. - 2
Clear and prepare the workspace
Remove clutter from the shelf and nearby surfaces. Clean the area to minimize dust and check that there’s room for air circulation around the printer. Align the shelf so it is level before placing any components.
Tip: Use a small level to confirm horizontal alignment before the printer goes on top. - 3
Check weight capacity and add anti-vibration support
Confirm the shelf can support the printer plus a safety margin. Place anti-vibration mats or felt feet under the printer to reduce movement and noise during operation.
Tip: If your printer has a heavy paper tray, consider adding a lightweight spacer under the unit to balance weight. - 4
Position a printer stand or base if needed
If the shelf isn’t perfectly flat or you’re placing the printer on top, use a stand or slotted panel to create a stable base. Align so the front of the printer lines up with the shelf edge for easy access.
Tip: A dedicated stand reduces resonance and makes maintenance easier. - 5
Place and align the printer on the shelf
Carefully lower the printer onto the anti-vibration surface. Check that the control panel is accessible and that there is still clearance for opening paper trays.
Tip: Don’t force the printer into a tight space; adjust the shelf height if needed. - 6
Route and secure cables
Attach cables with clips along the back of the shelf. Use color-coded wires and avoid pinching where the shelf meets the printer. Ensure the power cord can reach the outlet without stretching.
Tip: Label each cable to simplify future maintenance. - 7
Power, firmware, and initial test
Connect to power and any required network. Update firmware if available and run a basic alignment and test page to confirm prints align with the page margins.
Tip: Keep firmware up-to-date to improve compatibility with new media sizes. - 8
Paper loading and media setup
Load paper into the tray, verifying size and type. Adjust guides to fit the media and run a test print to verify feeding and alignment.
Tip: Reserve a small, accessible spot for extra paper to reduce reloading trips. - 9
Final checks and routine maintenance
Double-check vent clearance, surface stability, and cable security. Create a simple maintenance checklist for monthly dusting and quarterly calibration.
Tip: Keep a small toolkit nearby for quick adjustments.
People Also Ask
What is the ideal shelf depth for a printer?
Most printers require at least 12–18 inches of depth to accommodate the device and trays, plus extra room for airflow. Always verify your printer’s width, depth, and any protruding cables before choosing a shelf.
Most printers need 12 to 18 inches of depth, with room for trays and cables. Check your specific model’s measurements.
Can I place a printer directly on a bookshelf without a stand?
Yes, if the shelf is sturdy, level, and can handle the printer’s weight. Use non-slip padding to reduce movement and ensure easy access to controls.
You can place a printer directly on a sturdy, level shelf with padding to prevent movement.
How do I prevent overheating on a bookshelf setup?
Keep at least 2–3 inches of clearance around the printer, avoid heat sources, and improve airflow with open sides or a small fan if the room is warm.
Ensure 2–3 inches of clearance and good airflow; avoid heat sources nearby.
What is the best way to manage cables on a printer shelf?
Use cable clips or Velcro ties to route cables along the back of the shelf. Label each cable and use surge-protected outlets to protect equipment.
Cable clips and labels help keep cords tidy and safe.
How much space should I leave around the printer for maintenance?
Leave at least 2–3 inches around the printer for air and access. Periodically clean vents and check for dust buildup.
Give 2–3 inches of space around the printer and clean vents regularly.
Is it okay to move the printer if I need to rearrange the shelf?
Yes, but do so carefully. Power down, unplug cables, move slowly to avoid jamming the tray or misaligning the print head, and re-check alignment afterward.
Yes, but power down and move slowly to avoid misalignment.
Watch Video
Quick Summary
- Plan space and ventilation before moving furniture.
- Use anti-vibration tools to reduce noise and movement.
- Cable management improves safety and maintenance.
- Regular maintenance extends printer life.