How to Put Printer Ink: A Complete Step-by-Step Guide
Learn how to put printer ink correctly in your inkjet printer with a practical, safety-first guide. From identifying cartridges to aligning after installation, Print Setup Pro walks home users through every essential step for clean, reliable prints.

This guide explains how to put printer ink in most inkjet printers, including identifying the right cartridge, preparing the printer, and installing without spills. It covers safety, alignment, and disposal so you can finish the replacement quickly and confidently. According to Print Setup Pro, careful preparation and correct seating reduce waste and prevent misprints.
Understanding the task: why you’re putting printer ink
When you set out to perform routine ink cartridge replacement, you're doing more than swapping a color or black ink. The goal is to restore print quality, prevent ink spills, and avoid damaging the printer's internal components. In this guide on how to put printer ink, you’ll learn to match cartridges to your model, prepare a clean workspace, and follow safe handling practices. According to Print Setup Pro, careful preparation and correct seating reduce waste and prevent misprints. If you rush, you'll likely experience air bubbles, streaks, or paper jams that force reprints and waste time. By the end, you'll feel confident in performing replacements with minimal downtime.
Safety and prep: gather cartridges and power down
Before touching any ink, power down the printer completely and unplug the power cord. This reduces the risk of electrical shock and prevents the print head from moving unexpectedly. Have the replacement cartridges ready, a clean work surface, and a shallow tray to catch any drips. Wear gloves if you want to avoid ink on your hands, and use a lint-free cloth to wipe removable panels if needed. Keep the printer's manual handy for model-specific steps and warnings. Taking a moment to prep now saves time later and lowers the chance of accidental spills.
Identify the right ink cartridges and check compatibility
Check your printer model to ensure you buy cartridges designed for that device. Look for the exact cartridge numbers on the packaging and compare them to your printer’s label. Color and black cartridges may be separate; some printers require a specific order for multi-color cartridges. If you’re unsure, consult the model’s manual or manufacturer support site. Using the wrong cartridge can clog lines, cause color balance issues, or trigger error codes. When in doubt, verify with a manufacturer-approved source.
Preparing the work area and printer
Clear the desk area and lay down paper towels or a disposable cloth to catch any spills. Remove the paper tray or slide out the cartridge access area as instructed in the manual. Have a shallow tray ready for old cartridges and a clean, dry cloth for wiping residue. Keep ink bottles or cartridges upright to prevent leaks. Avoid touching the print head or copper contacts during the process, and avoid placing cartridges on fabrics that could stain.
Removing the old cartridges one at a time
Open the access panel and locate the cartridge you’ll replace first. Push the tab or lift the cartridge straight up to release it, then pull it away from the printer gently. Avoid twisting or forcing cartridges, which can damage seals. Place removed cartridges in a tray or on paper towels to catch any residual ink. Move on to the next cartridge only after the previous one is securely removed. This minimizes accidental spills and keeps colors arranged correctly.
Preparing and handling new cartridges
Unpack the new cartridge, remove protective seals and tape according to the included instructions, and avoid touching copper contacts or gold nozzles. If your cartridge has a protective chip or clip, leave it in place until installation. Gently rock the cartridge back and forth if the manual suggests priming, then align the cartridge with its color-coded slot. Hold it level to avoid creating air pockets. This step reduces the chance of misfeed or inaccurate ink flow.
Inserting new cartridges correctly
Insert the new cartridge at a slight angle into its slot, then push down until it clicks into place. Make sure you’re using the correct slot for each color; misplacing colors can cause the printer to misread ink levels. Reinsert each cartridge one by one, securing them firmly but not forcing them. If your printer uses an express resume function, press the load/insert button as instructed by the manual. Close the access panel before proceeding.
Post-installation: align, prime, and test
Reconnect power and turn on the printer. The first action should usually be printing an alignment page—this helps set the print head position after new ink. Follow on-screen prompts or use the printer software to run a head cleaning, if offered. Allow any automated processes to complete and then print a test page from your computer. Review for color balance, line gaps, or misalignment, and repeat an alignment if needed. Proper alignment improves overall print quality and extends cartridge life.
Troubleshooting common issues
If the printer still doesn’t recognize a new cartridge, reseat it and restart the printer. Check that you installed the correct cartridge in the correct slot and that the protective tape has been removed. Some printers require a firmware update to accept updated cartridges; consult the manufacturer’s site for steps. If you see ink leakage, wipe the area with a lint-free cloth and let the cartridge settle before trying again. Persistent issues may indicate a defective cartridge or a printer fault.
Maintaining print quality and saving ink
To maximize cartridge life, print regularly and use draft mode for everyday documents to save ink. Keep printer drivers up to date and avoid leaving cartridges partially empty. Periodically perform print head cleaning as recommended by the manufacturer. Store spare cartridges sealed and upright to prevent drying. Using printer-specific types of ink can improve longevity and reduce clogging. These habits help you avoid repeated replacements and keep costs under control.
Environmental and disposal considerations
Recycle or properly dispose of used cartridges according to local guidelines. Many manufacturers offer take-back programs; check if your brand participates in a recycling initiative. Clean up any accidental spills immediately to avoid staining floors or surfaces. When storing spare cartridges, keep them sealed in their original packaging to preserve ink quality and prevent drying.
Quick-start checklist for future replacements
Keep a small stock of the correct cartridges for your printer model, and verify compatibility before opening packaging. Set aside a clean workspace with a protective mat or newspaper to catch any spills. Always power down, unplug, and open the cartridge access area as instructed in the manual. Handle cartridges by the edges, avoiding copper contacts or nozzles; remove protective tape only when ready to install. After installation, run an alignment and a test page, and re-run alignment if colors look off. Label each cartridge on your shelf with model and color for quick future reference. Finally, recycle used cartridges through the printer manufacturer's program or local recycling services.
Tools & Materials
- Replacement ink cartridges (color and black)(Ensure compatibility with your printer model; have both color and black if your printer uses both.)
- Lint-free microfiber cloth(For wiping residue around cartridge slots.)
- Isopropyl alcohol wipes (70%)(Use to clean non-plastic surfaces; avoid contact with cartridge seals.)
- Disposable paper towels(Catch drips and spills during replacement.)
- Printer manual (printed or digital)(Model-specific steps and warnings.)
- Protective tray or newspaper(Takes up spills and keeps workspace clean.)
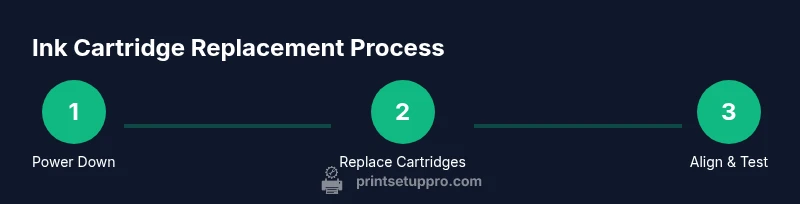
Steps
Estimated time: 15-25 minutes
- 1
Power down and open the printer
Turn off the printer and unplug the power cord. Open the cartridge access panel to reveal the ink slots. This prevents ink spraying and allows safe handling before removal.
Tip: Unplug before touching internal parts and wait 60 seconds for any residual movement to stop. - 2
Remove old cartridges one at a time
Gently lift each cartridge straight up to release it from its slot. Avoid twisting or forcing; this can damage seals or the print head. Place the old cartridge on a tray or paper towels.
Tip: Keep colors separated and handle with care to prevent spills. - 3
Prepare new cartridges
Unpack the replacement cartridge and remove protective tapes or seals per the instructions. Do not touch copper contacts or ink nozzles.
Tip: Leave protective chips in place until installation if required by your model. - 4
Install new cartridges
Insert each cartridge into its matching color-coded slot at a slight angle, then press until you hear a click. Confirm the color order matches your printer’s layout.
Tip: Install one cartridge at a time to reduce mix-ups. - 5
Run initial priming or alignment
Close the panel, reconnect power, and run a printer alignment or head-prime if prompted by your device software. This helps set the correct ink flow for fresh cartridges.
Tip: If your printer has a dedicated alignment page option, use it for best results. - 6
Print a test page
Print a test page from your computer to verify color balance and alignment. Look for gaps, color shifts, or streaks and address them with another alignment if needed.
Tip: If any color is missing, reseat the cartridge and re-run alignment before printing again. - 7
Clean up and recycle
Dispose of any packaging and clean the workspace with a lint-free cloth. Recycle empty cartridges through the manufacturer’s program or local services when possible.
Tip: Keep records of replacements for maintenance planning.
People Also Ask
Do I need to replace all cartridges at once?
No. Replace only the cartridges that are empty or failing. After installation, run alignment to calibrate the print head for the remaining colors.
No—only replace the cartridges that are empty, then run alignment to calibrate the print head.
What should I do if the printer won’t recognize the new cartridge?
Ensure you installed the correct cartridge in the correct slot, reseat it gently, and restart the printer. Check for any protective tape that may still be in place and consult the manual if needed.
If the printer won’t recognize it, reseat the cartridge, restart, and check that you removed any protective tape.
Can I use third-party cartridges?
Some printers support third-party cartridges, but they may affect warranty or ink quality. Always verify compatibility and consider using manufacturer-approved cartridges for best results.
Some printers accept third-party cartridges, but they may affect warranty and quality, so check compatibility first.
How long does the alignment take after replacement?
Alignment typically takes a few minutes and is often automated. If color balance is off, run alignment again or perform a manual print head clean.
Only a few minutes; if needed, run the alignment again to improve color balance.
Why is there ink leakage after replacement?
Ink leaks can occur if a cartridge isn’t seated correctly or if packaging wasn't removed as instructed. Wipe gently and reseat, then run a test page.
If you see leaks, reseat the cartridge and run a test page after cleaning the area.
Watch Video
Quick Summary
- Identify the correct cartridges and model compatibility.
- Handle cartridges carefully to prevent leaks and damage.
- Run alignment and test pages for optimal print quality.
- Recycle spent cartridges responsibly to reduce waste.