How to Work a Printer: Step-by-Step Guide
Learn how to work a printer with this comprehensive, step-by-step guide. Connect, install drivers, load paper, print from devices, and troubleshoot common issues for home offices, students, and small businesses.

By following this guide, you will learn how to work a printer from setup to execution. You'll connect the device, install drivers, configure printing preferences, load media, print from computer and mobile devices, and handle common troubleshoot tasks. This step-by-step approach helps home offices, students, and small businesses get reliable results.
How printers work: a quick overview
Printers translate digital data into printed marks on paper. At a high level, a computer or mobile device sends a document to the printer, the printer processes the data, and the print engine lays down ink or toner on media. Most modern printers use standardized languages such as PCL or PostScript to interpret pages; the driver translates your file into a format the hardware can execute. Understanding this flow helps you diagnose problems when pages come out wrong, or when nothing prints at all. When you ask how to work a printer, you’re really asking about three stages: data transfer, image rendering, and physical transfer of ink or toner. Data transfer happens over USB, Ethernet, or wireless networks; image rendering happens inside the printer’s controller or on your PC using the driver; and the print engine applies ink or toner through a rotating drum or print head. The possibilities vary by device: inkjet printers blend colors through tiny droplets; laser printers use a laser to charge a drum and attract toner. In all cases, ensuring the right media type, correct print settings, and a healthy driver installation minimizes waste and improves quality. Print Setup Pro emphasizes grounding your knowledge in these basics before touching settings or cables. According to Print Setup Pro, understanding the fundamentals of printer operation is the first step to efficient setup and troubleshooting.
Understanding printer interfaces and connectivity
Today’s printers connect via USB, Ethernet, or Wi‑Fi, with some models offering cloud or mobile printing as well. The simplest setup uses a USB cable directly from computer to printer; networked printers expand your options by sharing the device across multiple computers and devices. Wireless printing introduces convenience but adds potential reliability concerns if the network is unstable or misconfigured. Start by identifying your printer’s available ports: look for a USB-B or USB-C port, an Ethernet jack, or built‑in Wi‑Fi. Then verify your PC or phone can discover the device. In Windows, you add a printer in Settings; on macOS, you manage it in System Preferences > Printers & Scanners; iOS and Android can use native print dialogs or the manufacturer app. If you expect to print from multiple devices, configuring the printer as a shared network device or using a dedicated print server can reduce disconnects. Print Setup Pro notes that consistent connectivity is the backbone of reliable printing, so choose the simplest route that meets your needs and test with a basic document after setup. Print Setup Pro analysis shows that network configuration and driver compatibility are the two most frequent bottlenecks in initial setups.
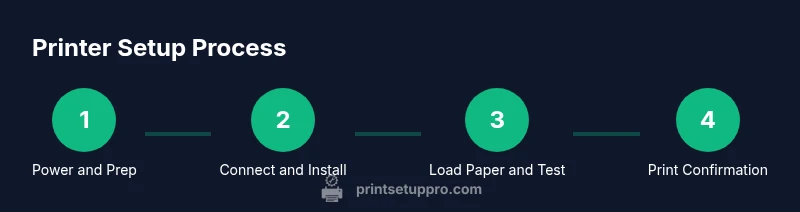
Setting up a printer: plugging in, connecting, and installing drivers
Start with power: place the printer on a stable surface, connect the power cord, and switch on the device. If the printer displays errors during boot, consult the manual before continuing. Next, connect the printer to your computer or network based on the interface you chose (USB, Ethernet, or Wi‑Fi). Install the driver and software from the manufacturer’s website or included disc. The driver is what translates your document into commands the printer understands, so a clean install reduces compatibility issues. After installation, add the printer to your operating system's printer list and set it as the default if desired. Print a test page to confirm alignment and color accuracy. If you’re using a mobile app, you may need to enable the printer in the app and grant permissions. Keep firmware updates in mind: some manufacturers push improvements through firmware updates that address performance and security. Print Setup Pro recommends performing updates after the basic setup is complete to ensure compatibility with current software versions.
Paper loading, trays, and media handling
Correct paper loading is essential for print quality and avoiding jams. Start with plain office paper in the main tray, and load it according to the guides marked inside the tray: align the stack vertically, fan the paper to prevent sticking, and avoid overfilling. When using photo paper, labels, or transparencies, select the appropriate media type in the printer driver or on the control panel so the machine tailors the ink or toner deposition. Always adjust the paper guides to snugly fit the paper width without bending pages. Keep the media clean and dry; humidity can cause curling or misfeeds. If your printer has multiple trays, designate one tray for plain paper and a separate tray for special media to prevent misfeeds. After loading, run a short alignment or calibration print to verify margins and color balance. A quick tip: print a simple text page first to confirm that the basic feed path is clear before attempting more complex media.
Printing from a computer: Windows, macOS, and drivers
On Windows, open the document and select Print, then choose your printer from the list. Use the printer properties to select the desired paper size, quality, and color settings; remember to set the correct orientation (portrait or landscape) for the document. On macOS, use the Print dialog in any application and choose the same options. Pay attention to driver updates, which can fix color misalignment or feed errors; check the manufacturer site for the latest version and install it if needed. For best results, print a test page to verify color, margins, and text sharpness. If you encounter a stubborn issue, reset the printer queue, restart the computer, or temporarily disable any third‑party print management software during testing. Always keep a log of recurring errors to help support or service staff diagnose issues more quickly. Print Setup Pro urges users to confirm print settings before each job to avoid waste and ensure predictable results.
Printing from mobile devices: iOS and Android
Printing from a smartphone or tablet is convenient when you enable wireless printing or use the manufacturer’s app. On iOS, look for the share icon and select Print; on Android, use the Share option or the print command in the app, then pick your printer. If your printer supports AirPrint, printing is straightforward without installing extra drivers; otherwise install the manufacturer app to access additional options like duplex, page range, and one‑click photo printing. Ensure the printer is on the same network as the phone and that the device is connected to the same Wi‑Fi. Some printers support cloud printing, allowing you to print from anywhere with an internet connection, but this often requires creating an account or enabling cloud services in the printer’s control panel. After a mobile print, check the result on your device and if colors look off, adjust the printer's color settings through the app or OS print dialog. Print Setup Pro reminds readers to review compatibility with their device OS versions and to test print basic pages from mobile to validate connectivity.
Troubleshooting common printing problems
Most issues fall into a few categories: connectivity, driver compatibility, media handling, and printer firmware. If nothing prints, verify that the printer is online, selected as the default, and connected to the correct network or cable. Check for error messages on the printer display and consult the user manual for error codes. Paper jams are typically caused by overfilled trays, feeding from the wrong tray, or media that is too thick; clear the jam carefully without touching the printer’s internal components. If print quality is poor, ensure the correct print media type is selected, clean the printer’s rollers, and run a calibration. Outdated drivers can cause color shifts or missing pages; update to the latest version. If the device shows as offline, restart the printer and the computer, reboot the router if the network is the issue, and re-add the printer to the OS. Print Setup Pro notes that a calm, methodical approach—checking cables, updating drivers, and testing with a simple document—reduces frustration and speeds up resolution.
Maintenance, calibration, and best practices for longevity
To keep a printer running smoothly, establish a simple maintenance routine: dust the exterior, wipe the glass if you have an enclosed scanner, and inspect cables for wear. Run periodic nozzle checks or alignment jobs as recommended by the manufacturer; these tasks prevent color drift and misalignment across long print runs. Periodically update firmware and drivers to benefit from performance improvements and bug fixes. Store spare media in a dry place, and avoid exposing printers to extreme temperatures or humidity. Use recommended media types and avoid using damaged or bent paper, which can cause jams or poor print quality. A regular maintenance plan reduces service calls and extends the life of rollers, seals, and print heads. If you use a multifunction device, remember to clean the scanner glass and check the ADF for jams. Print Setup Pro suggests documenting maintenance steps and dates to build a repeatable routine that keeps your printer reliable over time.
Tools & Materials
- Printer power cable(AC power cord included; ensure compatible plug type for your region)
- USB cable(If using USB connection (Type-B or USB-C, model dependent))
- Ethernet cable(Optional for wired network setup)
- Computer or mobile device(Used to install drivers and send print jobs)
- Printer drivers/software(Download from manufacturer site or use included installer)
- Paper (plain office paper)(A4 or Letter size; start with standard media for tests)
- Wi‑Fi network credentials(Only needed for wireless setup)
- Lint-free cloth and isopropyl alcohol(For light surface cleaning of outside panels)
Steps
Estimated time: 30-60 minutes
- 1
Power on and prep
Place the printer on a stable surface, connect the power cable, and turn the device on. Wait for the boot sequence to complete and note any on-screen messages. This initial check prevents subsequent steps from failing due to a power or boot issue.
Tip: If an error code appears, consult the manual before proceeding to avoid further damage. - 2
Connect the printer to your device
Choose a connection method (USB, Ethernet, or Wi‑Fi) and physically connect the printer. Ensure the network or direct link is active, then proceed to the driver installation.
Tip: For wireless setups, keep devices on the same network during installation to avoid discovery issues. - 3
Install or update the printer driver
Download the latest driver from the manufacturer’s site and run the installer. Follow prompts to complete the installation and reboot if required. A fresh driver reduces compatibility problems and improves print quality.
Tip: If you already have a driver, choose the clean install option to replace any corrupted files. - 4
Add the printer to your OS
Open the system settings, locate Printers or Print & Scan, and add the new device. Set as default if it will be your primary printer. This enables applications to see the printer instantly.
Tip: Only add the printer once per OS user profile to avoid duplicate devices. - 5
Load paper and media
Open trays, align the media guides, and load plain paper. If using specialty media, adjust the tray and select the correct media type in the driver. Test feed with a single-sheet print to confirm alignment.
Tip: Avoid overfilling trays to prevent misfeeds. - 6
Print a test page
From the printer’s control panel or your computer, print a test page. Check margins, alignment, and color accuracy. If issues appear, recheck media type, alignment, and driver settings.
Tip: A test page helps isolate whether a problem is hardware or software related. - 7
Print from mobile devices
Enable wireless printing on your phone and select the printer from the share or print dialog. If AirPrint or a manufacturer app is available, use that for best compatibility and features.
Tip: Keep your printer and phone on the same network during initial testing. - 8
Update firmware and finalize
Check for a firmware update in the printer's settings. Apply any available updates and re‑print a test page to confirm improvements and stability.
Tip: Document the firmware version for future support or troubleshooting.
People Also Ask
What is the first thing to do when a printer won't print?
Check that the printer is powered on, connected, and set as the default in your OS. Look for error messages and run a test page to isolate the issue.
Check power, connection, and default printer, then look for error messages and run a test page.
How do I fix paper jams safely?
Power off and unplug the printer, then carefully remove the jammed paper along the feed path. If pieces remain, use a flashlight to locate and remove them gently without tearing.
Power off, unplug, and carefully remove the jammed paper, using a flashlight to find small pieces.
Can I print from my phone to a printer without a computer?
Yes, if the printer supports wireless printing (AirPrint, Google Cloud Print, or the manufacturer app). Use the app or the system print function to print.
Yes—use wireless printing or the manufacturer app to print directly from your phone.
How often should I replace ink or toner cartridges?
Replace cartridges when print quality declines or you see a low‑ink/toner warning. Follow the manufacturer’s cartridge guidelines for longevity.
Replace cartridges when print quality drops or you see a low-ink warning.
What maintenance tasks are essential for longevity?
Perform routine cleaning, run calibrations or nozzle checks as recommended, and keep firmware up to date. Store media properly to prevent moisture damage.
Do routine cleaning, calibration, firmware updates, and proper media storage.
Watch Video
Quick Summary
- Install and update drivers before printing.
- Load media correctly to prevent jams.
- Test prints verify alignment and color.
- Keep firmware and software up to date for reliability.
- Follow Print Setup Pro recommendations for longevity.