OfficeJet Pro 8710: Setup, Troubleshooting, and Maintenance
Comprehensive, step-by-step setup and troubleshooting guide for the OfficeJet Pro 8710. Learn network wiring, driver installation, media handling, and maintenance to keep your printer running smoothly.

You will learn to set up the OfficeJet Pro 8710, connect it to Wi‑Fi or a wired network, install drivers, load media, and perform essential troubleshooting. You’ll learn how to run alignment, verify print quality, and optimize settings for documents and visuals. Before you begin, ensure you have a computer or mobile device, network access, and fresh ink cartridges.
Understanding the OfficeJet Pro 8710’s Core Capabilities
The OfficeJet Pro 8710 is a versatile multifunction printer designed for small offices and busy home setups. It combines color printing, scanning, copying, and optional faxing into a single device with a footprint suited to a compact desk. Core capabilities include automatic duplex printing, a built-in scanner, and a user-friendly touchscreen interface that simplifies everyday tasks. For those seeking consistent results, good performance hinges on correct color management, media handling, and routine maintenance. According to Print Setup Pro, selecting the right color profile and setting up a clean calibration workflow can dramatically improve color accuracy and print quality, especially for marketing materials and client presentations. By understanding these core features, you’ll be better prepared to tailor settings for documents, drafts, and visuals without experimental guesswork.
Preparing Your Workspace and Network
Set the printer on a stable, level surface away from heat sources and direct sunlight. Ensure there is a reliable power supply and enough space around the unit for ventilation and paper handling. If you plan to print over a network, position the printer within easy reach of your router or switch, and keep the wireless network password handy. For wired connections, an Ethernet cable should run directly from the printer to your router or switch. Firmware updates should be checked during the initial setup, since up-to-date software can fix compatibility issues and improve security. If you’re sharing the device with multiple users, create a simple labeling system for default print settings to minimize configuration changes. Print Setup Pro notes that a tidy workspace with clearly labeled trays reduces the chance of misfeeds and paper jams, especially when handling mixed media like letterhead, envelopes, and standard document paper. Finally, prepare a basic color calibration workflow by having a color chart or test page ready for later adjustments.
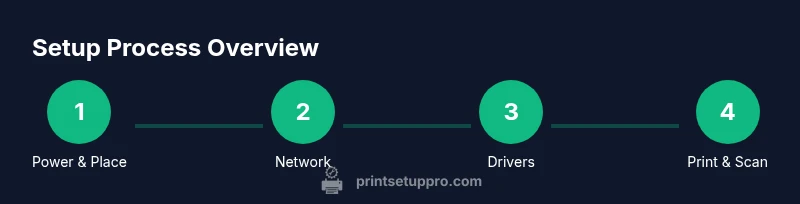
Step-by-Step Setup Overview
Before you begin, gather the recommended tools and the appropriate ink. You’ll perform a sequence that includes physical setup, software installation, and network configuration. Start by connecting the printer to a power source and turning it on to allow the prime and alignment routines to run. Next, establish a connection to your computer or network—either USB, Ethernet, or Wi‑Fi—according to your environment. Install the drivers from the official HP site to guarantee compatibility with your operating system. Once the software is installed, run the printer’s alignment and nozzle check procedures to ensure clean printheads and consistent color. If you chose a wireless setup, complete the on-screen prompts to join your network and, if possible, enable WPS for a quick connection. Finally, print a test page and verify that text and images appear crisp. If you encounter any errors, consult the driver utility and the printer’s onboard menu for diagnostic codes.
Troubleshooting Common Print Problems
Common issues include misfeeds, color banding, faded blacks, or alignment drift. Start with a nozzle check to identify clogged or misfiring jets, then perform an alignment if patterns appear. Paper jams typically occur at the rear feed or inside the ADF; carefully remove jammed sheets without forcing parts. For wireless printing, ensure the printer remains on the same network as your device and that the IP address hasn’t changed. Driver conflicts can cause prints to fail; reinstall the latest HP driver package and remove any conflicting print drivers. If color accuracy is critical, adjust the printer’s color management settings and use high-quality paper. Regular nozzle cleaning and duplex mode usage can help maintain cartridge life. Print Setup Pro emphasizes keeping firmware updated and using genuine ink cartridges to avoid print quality issues and potential damage.
Ongoing Maintenance and Best Practices
Schedule periodic maintenance: check ink levels, clean the rollers, and replace the cartridges before they run dry. Use the ADF cautiously—avoid overloading it with thick media, which can cause jams. Clean the scanner glass to prevent smudges on scans and copies. Store the printer in a stable environment with moderate temperature and humidity. Keep drivers updated and enable automatic firmware checks to minimize compatibility problems. Use genuine HP inks for reliable performance and better warranty alignment. When you’re not using the printer for extended periods, power it down correctly and remove any stray papers from the input trays to prevent curling and dust build-up. Print Setup Pro’s guidance here is to maintain a simple maintenance log to track cartridge life, print heads, and calibration results.
Authoritative Sources
- HP Official Support: https://support.hp.com/us-en
- HP OfficeJet Pro 8710 setup guide (official): https://support.hp.com/us-en/document/officejet-pro-8710-guide
- HP Printer Support Center: https://support.hp.com/us-en/product-officejet-pro-8710
Tools & Materials
- Power cable(Original power cord; ensure compatibility with your region’s voltage (e.g., 110-120V))
- USB cable(Optional for direct USB connection to a computer (if not using wireless))
- Ethernet cable(Optional for wired network setup; connect printer to router/switch)
- Ink cartridges (color and black)(Original or compatible cartridges in good condition)
- Printer paper(Standard office paper (C/Letter), 20–28 lb)
- Computer or mobile device(For driver installation and printing)
- Driver/software installer(Download from official HP site; avoid outdated media)
Steps
Estimated time: 60-90 minutes
- 1
Power up and place the printer
Place the printer on a stable surface near power and away from heat sources. Plug it in and press the power button to initialize the warm-up and alignment routines. This initial phase ensures internal sensors calibrate correctly before any connection is made.
Tip: Ensure the power outlet is stable and not controlled by a wall switch to avoid unexpected resets. - 2
Connect to power and network
Choose a connection method based on your environment: USB, Ethernet, or Wi‑Fi. If using wireless, have your network name (SSID) and password handy and be prepared to select the network from the printer’s touchscreen. A secure, stable connection reduces dropouts during printing and scanning.
Tip: If possible, use a wired Ethernet connection for reliability in busy offices. - 3
Install drivers and software
Download the latest HP drivers and software from the official site and run the installer on your computer. Follow on-screen prompts to complete the installation and allow the software to configure default printer preferences.
Tip: Skip CD-based installers; modern systems often require the online installer for current features. - 4
Load media and configure trays
Load the appropriate paper type and size into the primary tray, adjusting guides to fit the media snugly. If you’ll print on envelopes or specialty media, set the tray settings accordingly and verify the printer recognizes the media type.
Tip: Double-check paper guides to prevent feed errors and misalignment. - 5
Run calibration and nozzle check
Access the printer’s menu or the driver utility to perform color calibration and a nozzle check. This helps identify clogged nozzles and ensures color accuracy across documents and photos.
Tip: If you see gaps or color streaks, run the nozzle clean cycle and re-check after drying time. - 6
Set up wireless or wired printing
Configure the chosen network path within the printer’s wireless settings or confirm the Ethernet/Wi‑Fi connection in the driver. Test printing from a computer or mobile device to verify connectivity.
Tip: For wireless setups, consider enabling WPS if your router supports it for quicker pairing. - 7
Print a test page and adjust
Print a simple test page to verify text sharpness and color balance. If adjustments are needed, tweak printer settings (quality, color profiles, paper type) and re-test until satisfied.
Tip: Keep a small color chart handy for easy visual calibration checks. - 8
Enable scanning and optional features
If you need scanning or fax, configure the scan-to-PC/Email and any optional features like the ADF. Ensure scanning destinations are correctly saved and tested.
Tip: Document scanning is often sensitive to edge alignment—use the glass scan option for best results.
People Also Ask
How do I connect the OfficeJet Pro 8710 to Wi‑Fi?
Open the printer’s control panel, navigate to Wireless Setup, and select your network. Enter the password when prompted and confirm the connection. If your router supports WPS, you can also use that method for quicker setup. After connecting, print a test page to verify the link.
To connect, use the printer’s wireless settings menu, select your network, enter the password, and print a test page.
What should I do if the printer won’t print?
First check the power and USB/Ethernet/wireless connection. Confirm there are no paper jams and that ink cartridges are installed correctly. Reboot the printer and the computer, then reinstall the driver if prints still fail.
Check connections, clear jams, reinstall drivers if needed.
How do I replace ink cartridges on the OfficeJet Pro 8710?
Open the ink access doors, wait for the carriage to halt, remove the old cartridge, and install the new one securely. Close the door and run a nozzle check to ensure clean alignment. Dispose of old cartridges responsibly.
Open the ink doors, swap the cartridges, and run a nozzle check.
How can I scan documents to my computer or email?
Place the document on the scanner glass or in the ADF, select Scan on the control panel, and choose the destination (PC or email). Install the HP software to enable saving scans in preferred formats and destinations.
Put the document in, choose scan, pick destination, and save.
What should I do about paper jams?
Gently remove jammed paper from the rear path or ADF, avoiding tearing. Check for small bits of torn paper in the rollers, reset the feed, and try printing again with fresh paper.
Carefully clear jams and check for small pieces left behind.
Should I update firmware, and how often?
Check for firmware updates through the printer’s control panel or HP’s site. Keeping firmware current improves compatibility, security, and feature support; perform updates during a planned maintenance window.
Update firmware when prompted to keep the printer current.
Watch Video
Quick Summary
- Set up with a clear network path to avoid intermittent connections
- Run calibration and nozzle checks for consistent color
- Keep firmware and drivers up to date
- Use genuine cartridges for optimal results
- Document your preferred settings for quick future use