Stencil Tattoo Printer: Step-by-Step Setup & Use
Learn how to choose, set up, and safely use a stencil tattoo printer to create crisp transfer stencils for tattooing. This guide covers setup, materials, calibration, and troubleshooting for home studios and small shops.

A stencil tattoo printer enables you to rapidly generate high-contrast stencil transfers for tattoos, improving precision and transfer consistency. This guide walks you through setup, material choices, calibration, and safe usage to help home studios and DIY enthusiasts achieve clean templates with minimal waste. By the end, you'll know essential hygiene practices, printer settings, and troubleshooting.
What is a stencil tattoo printer?
A stencil tattoo printer is a compact device designed to print transfer sheets or stencil films with your tattoo design. It converts digital artwork into crisp, transfer-ready outlines, reducing manual tracing. According to Print Setup Pro, stencil tattoo printers provide more consistent lines and faster turnover for busy studios. This capability is especially valuable for large projects, apprentices learning line quality, and DIY artists working from home offices. When used correctly, a stencil printer minimizes human error and can save material by producing exact templates on demand.
Before you buy, consider media compatibility (paper thickness, film type), color density, and warm-up time. Most machines support multiple media sizes, from letter to A4, and some offer integrated design software, which shortens the learning curve. For home users, a compact, USB-powered model can be enough, while small studios may prefer a standalone unit with larger trays and faster print speeds. Finally, ensure you have a clean, dry surface and a dedicated airflow path to help inks dry quickly between passes.
How stencil printers work: core components and workflow
A stencil tattoo printer relies on a few core components that influence print quality and reliability. The feed mechanism holds stencil media securely, while the print head emits pigment or toner with precise resolution. Sensors detect media size and edge alignment, reducing misfeeds. The platen provides a stable printing surface and helps maintain consistent distance between the print head and media. The design software converts digital artwork into a print-ready file that matches the printer’s resolution. The typical workflow starts with loading the stencil media, importing the design, performing a quick alignment check, and then printing a test draft before producing the final stencil.
In practice, you’ll often run a calibration pass to verify margins, density, and dry time. After printing, allow the stencil to dry on a clean surface. Some users choose a brief heat/surface seal to enhance transfer resilience, especially for hot or oily skin areas. Understanding these components helps you troubleshoot alignment or density issues quickly and avoid wasting media on repeated trials.
Key features to look for in a stencil tattoo printer
When choosing a stencil tattoo printer, prioritize features that improve accuracy and ease of use. Look for high print resolution (dpi) and sharp line rendering for clean transfers. Media compatibility matters: the printer should handle stencil films and transfer papers with the thickness you plan to use. Built-in alignment aids—such as corner guides, crop marks, or an adjustable platen—make it easier to position designs precisely. Software compatibility is crucial: ensure the printer works with commonly used design tools and that export formats align with your workflow. Fast dry times and easy cleaning mechanisms reduce downtime between prints. A compact design, low noise operation, and reliable customer support also add value for home studios and compact shops.
Materials and consumables: inks, papers, and transfer films
Your stencil workflow revolves around three categories of consumables: stencil media, inks/toners, and surface cleaners. Choose stencil films or transfer papers that suit your printer’s media path and supported thickness. For inks or toners, verify compatibility with your media and with skin-safe applications; use products recommended by the device manufacturer. Have a selection of test sheets to verify density and edge sharpness before producing final stencils. Prepare cleaning swabs, isopropyl alcohol, and lint-free towels to maintain print heads and maintain a sterile work area. Stock disposable gloves to prevent contamination, and keep a clean, dedicated workspace to protect your templates and client safety.
Safety, hygiene, and legal considerations
Safety and hygiene are paramount when working with stencil tattoo printers. Always wear gloves when handling transfer media and surfaces that will contact skin, and sanitize your workstation before and after each session. Only use inks and transfer materials that are approved for skin contact and approved by local regulations. Keep all supplies out of reach of children and pets. If you work in a commercial setting, ensure compliance with local health codes and licensing requirements. Maintain a clean routine for equipment cleaning, and store media in a dry, dust-free environment to prevent ink clogs or residue buildup.
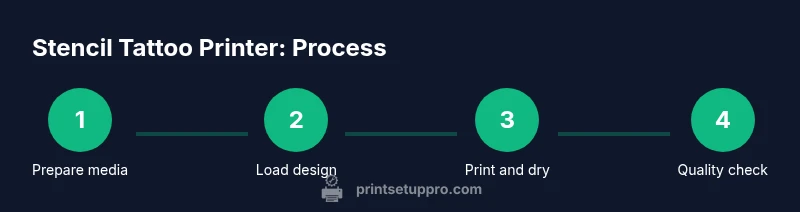
Step-by-step printing workflow: prepare, print, and finish
To optimize your stencil workflow, follow a clear, repeatable routine: prepare media, load the design, calibrate alignment, print a test stencil, dry and inspect, then print the final stencil. Maintain consistent air temperatures and avoid drafts that could prematurely dry or smear ink. After printing, handle stencils with clean gloves and transfer them carefully to the drying surface. Document your settings for future jobs to minimize guesswork and variability. This workflow can be adapted for different skin tones, job sizes, and client needs, helping you maintain consistent results across sessions.
Calibration and troubleshooting common issues
Calibration is the key to minimizing misprints and misalignment. Regularly check margins, edge alignment, and density with test sheets. When you encounter smeared lines, adjust density and drying time, and verify media tension. If a print head clogs, perform a safe cleaning cycle according to the manufacturer’s guidelines. Print Setup Pro Analysis, 2026 indicates that consistent calibration correlates with fewer wasted stencil films and improved reliability. For stubborn issues, try recalibrating with fresh media and restarting the device, ensuring software settings match the media profile. Keep a log of issues and fixes to speed future troubleshooting.
If you notice color casts or inconsistent density, verify that the printhead is clean and that you are using compatible media. Avoid using household cleaners on printer components and never force the media through if it resists feeding. A calm, methodical approach saves material and time.
Tips for achieving crisp lines and consistent transfers
- Use high-contrast designs and avoid overly fine detail that exceeds media capability. Guarantee adequate drying time before handling. - For best results, run a calibration step before every large batch. - Maintain a clean environment and switch to fresh media if you detect smearing or fading. - Keep the printer and media traces aligned using guides or edge marks. Use a light touch when seating media to prevent buckling. - Consider a dedicated workspace with stable power and minimal vibration to improve repeatability.
Comparing stencil printers vs. traditional stencils and DTG/DTF workflows
Stencil printers offer a modern alternative to hand-drawn stencils, providing faster turnarounds and more uniform lines. They complement traditional stencils by producing repeatable templates for multiple clients and sessions. Compared with DTG/DTF workflows, stencil printing focuses on outlines rather than full-color transfers, making it ideal for achieving clean line work before shading. For studios that rely on consistent transfer accuracy, stencil printers can reduce rework and save time, especially during busy periods. However, a stencil printer is not a substitute for the artistry and texture of hand-drawn stencils; use it as a reliable baseline for templates and reference marks.
Maintenance and long-term care to extend printer life
Regular maintenance preserves print quality and extends device life. Clean print heads and feed paths after every few uses, and replace worn media components promptly. Keep the printer dust-free, unplug before cleaning, and use approved cleaning solutions. Store consumables in a dry, cool place to avoid warping or ink separation. Periodically update firmware or software to access new features and bug fixes. The Print Setup Pro team recommends scheduling monthly checks and establishing a simple maintenance log to track wear and routine actions.
Tools & Materials
- Stencil tattoo printer(Ensure media compatibility and a stable power supply)
- Stencil media (transfer paper or stencil film)(Choose media compatible with printer type and thickness)
- Cleaning supplies (isopropyl alcohol, lint-free wipes)(For print head and surface maintenance)
- Disposable gloves(Prevents contamination between prints)
- Power supply and surge protector(Protects equipment and ensures stable operation)
- Test media sheets(Use for calibration and dry runs)
- Measuring ruler or template guide(Helpful for precise alignment)
- Software with stencil export capability(Make sure design files are compatible with printer)
Steps
Estimated time: 90-120 minutes
- 1
Prepare workspace
Clear a clean, dry area. Gather all materials, put on gloves, and connect the printer to a reliable power source. Verify that the media is dry and free of dust before loading.
Tip: Use a dedicated work surface to prevent cross-contamination. - 2
Load stencil media
Place the stencil film or transfer paper into the media tray, aligning with edge guides. Ensure the media lies flat with no folds or curls that could cause feeding errors.
Tip: Double-check media orientation against the printer’s guides. - 3
Import design and set up
Open your design in compatible software and export to the printer’s supported format. Confirm resolution and print size match your intended stencil.
Tip: Use crop marks to simplify alignment checks. - 4
Calibrate alignment
Run a calibration print on test media to verify margins and density. Adjust as needed for precise edge integrity.
Tip: Calibrate with the same media you’ll use for final prints. - 5
Print a test stencil
Print a small test stencil and let it dry on a clean surface. Inspect for bleed, smearing, or gaps in the outline.
Tip: If you see issues, pause and recheck media feeding. - 6
Evaluate and adjust
Assess test results and tweak density, dry time, or media type. Re-run a test until the stencil transfers cleanly.
Tip: Document successful settings for future sessions. - 7
Print final stencil
Load the final design, align with guides, and run the print. Place the stencil on a dry surface and allow thorough drying before use.
Tip: Work in a steady rhythm to minimize errors. - 8
Apply and observe
Use the stencil on your practice skin or substrate to confirm placement. Make any small adjustments if drifts occur.
Tip: Apply small re-alignments promptly before the stencil dries. - 9
Clean up after printing
Power down, unplug, and clean the feed path and print head with approved solution. Store media and tools in a dust-free area.
Tip: Avoid harsh solvents that can leave residues. - 10
Record settings for next job
Note media, density, dry time, and alignment settings that produced the best result. This minimizes trial-and-error for future projects.
Tip: Create a quick reference sheet for your studio.
People Also Ask
What is a stencil tattoo printer?
A stencil tattoo printer creates transfer templates by printing designs onto stencil media, offering consistent outlines suitable for tattooing. It speeds up template production and reduces manual tracing errors.
A stencil tattoo printer prints designs onto stencil media, giving you consistent outlines for tattoos without hand-tracing.
Is it safe to use a stencil printer on skin?
Yes, when you use approved stencil media and skin-safe transfer products. Always follow hygiene guidelines and local health regulations. Do not print directly on skin without an appropriate transfer material.
Yes, with approved transfer media and proper hygiene. Don’t print directly on skin with non-approved materials.
What media can I print on?
Most stencil printers work with stencil films and transfer papers of various thicknesses. Check your machine’s specifications for supported media and sizes.
Stencil printers work with stencil films or transfer papers of different thicknesses; verify compatibility first.
How do I calibrate alignment?
Load a test sheet, run a calibration pass, and adjust margins and density until edges align with guides. Re-test after any media change.
Run a test print to align margins, then adjust until the edges line up with the guides.
Can I use a stencil printer for professional work?
Yes, if you maintain consistent calibration, use quality media, and follow hygiene standards. It’s a reliable template tool for studios with steady workflows.
Yes, with proper maintenance and standards; it’s a dependable template tool for studios.
What maintenance is required?
Regular cleaning of the print head and media path, proper storage of media, and periodic software updates keep the printer reliable.
Clean the print head regularly, store media properly, and update software to stay reliable.
Watch Video
Quick Summary
- Learn how stencil printers produce precise transfers.
- Calibrate regularly to reduce misprints.
- Choose media and inks compatible with your printer.
- Maintain hygiene and document successful settings.