Printer Not Printing Black: Quick Fixes & Troubleshooting
Urgent guide to diagnose and fix black ink output issues. Learn practical steps, avoid common mistakes, and restore reliable black printing for home offices, students, and small businesses.

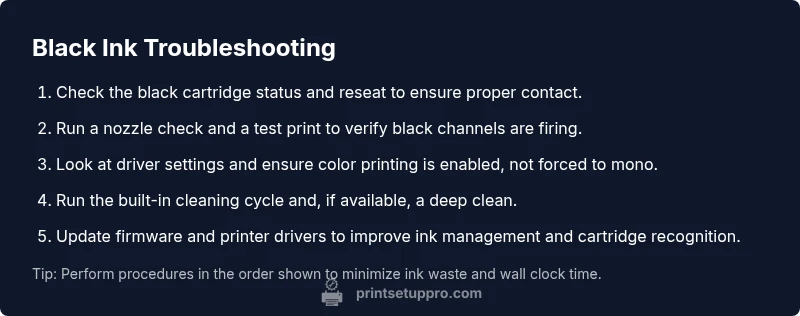
Most often, a printer not printing black is caused by cartridge or print head issues. According to Print Setup Pro, start by checking the black cartridge status, perform a nozzle check, and run a quick head-cleaning if needed. Then verify printer settings and paper/type profiles to rule out simple config problems. This fast path can save a service call and restore reliable black output quickly.
Why Black Output Fails
There are several root causes when your printer isn't printing black. The most common are a low or empty black cartridge, a clogged print head, or the printer being set to grayscale or a color setting that ignores black ink. Less obvious but frequent culprits include using non-genuine cartridges, incorrect cartridge installation, or a driver update that alters color management. If you rely on color inks for maintenance, color channels could be low causing a perceived absence of black. Finally, paper type and media settings matter; some papers need specific profiles to render true black. Treat this as a structured diagnostic: start with the simplest checks and move toward deeper maintenance.
Pro tip: keep a small Windows/macOS color profile handy, and test on standard paper to isolate variables quickly.
Check printer settings and cartridge status
Begin with fast, non-destructive checks: confirm the black cartridge is properly seated and has ink; reseat it if necessary. Print a nozzle test to see whether the black nozzle is firing. Check the printer driver and app settings to ensure color printing is enabled and grayscale is not forced. Also verify the correct paper size and type is selected; wrong media settings can affect ink deposition and perceived brightness. If your printer shows a cartridge error, replace or reseat the cartridge and re-test. These steps address the vast majority of early issues and prevent unnecessary maintenance.
Nozzle check, cleaning cycle, and test prints
If the nozzle seems to be firing irregularly, run a nozzle check. Observe whether all black dots appear in a consistent row. If there are gaps, perform the printer's cleaning cycle and re-test. In some models you may need to run a deep clean or use a built-in diagnostic. After cleaning, print a fresh test page to confirm improvement. If the issue persists, proceed to the next sections without delay to avoid wasting ink. Consistency here matters for long-term reliability.
Inspect cartridges, print head health, and firmware
Inspect the black cartridge for proper contact with the cartridge holder and electrical contacts. If the printer reads 'low' or 'empty', replace the cartridge with a compatible one. If the cartridge is new, remove and reinsert to ensure a solid connection. Check for firmware updates from the manufacturer and install them if available, since updates can improve cartridge recognition and color handling. Make sure your driver isn’t set to mono printing and verify color management profiles. A misconfigured driver can mask a simple cartridge issue as a print defect.
When to replace or service
If you still cannot print black after trying basic fixes, the problem might be a clogged or damaged print head, a broken connector, or an internal ink channel fault. In this case, contact the printer manufacturer support or a qualified technician. Have your model, cartridge type, and a log of steps you performed ready to share, to speed up troubleshooting. Do not delay if you rely on prints for work or school assignments—the cost of downtime can exceed the price of a service call.
Prevention and best practices
Create a simple maintenance routine to prevent future issues: run nozzle checks monthly, use genuine cartridges when possible, and avoid letting ink dry in the head by printing periodically. Store spare cartridges upright and keep the printer connected to power to maintain ink circulation. If you rarely print, perform a small test page every couple of weeks to keep the nozzles clear. Consistent upkeep reduces the likelihood of stubborn clogs and color misalignment over time.
Steps
Estimated time: 15-25 minutes
- 1
Check ink levels and reseat cartridge
Power off the printer, open the cartridge access area, and carefully remove the black cartridge. Inspect the contacts for dirt or corrosion, wipe gently with a lint-free cloth, reseat, and run a quick test page. If the printer still reports low ink, replace the cartridge.
Tip: Handle cartridges with care; avoid touching gold contacts to prevent transfer of oils. - 2
Run a nozzle check
Navigate to the printer utility and select Nozzle Check or Print Quality Test. Review the output for gaps in the black nozzle row. If gaps exist, proceed to step 3 before retesting.
Tip: Print a calibration page on plain paper for clearer results. - 3
Initiate a cleaning cycle
Run a standard cleaning cycle, then a second pass if the nozzle check showed gaps. After cleaning, print another nozzle check. If the result improves, run a test page to confirm black output.
Tip: Avoid multiple heavy cleanings in quick succession; this wastes ink. - 4
Verify driver settings
Open the printer driver, check that Color is selected, not Grayscale or Mono. Ensure the correct paper size/type is chosen and that any color management profiles are appropriate for your media.
Tip: If using a print-from-app, verify the app’s color settings as well. - 5
Check firmware and cartridge compatibility
Look for firmware updates on the manufacturer site and install them. Reconfirm you’re using an approved black cartridge for your model. If necessary, reinstall the driver.
Tip: Backup settings before a firmware update to avoid misconfigurations. - 6
Final test and preventive setup
Print a full test page including black areas to ensure consistency across tonal ranges. Set a monthly maintenance reminder for nozzle checks and consider a light cleaning cycle every few weeks if prints degrade.
Tip: Create a simple maintenance log to track ink usage and issues over time.
Diagnosis: Printer not printing black
Possible Causes
- highLow or empty black cartridge
- mediumPrinter set to grayscale or mono printing
- mediumPrint head clogged or dried
- lowIncorrect or incompatible cartridge installed
Fixes
- easyReplace or reseat the black cartridge and re-test
- easyCheck and adjust printer settings to enable color printing; disable grayscale
- easyRun the printer's cleaning cycle and perform a nozzle check; repeat if needed
- mediumUpdate firmware and reinstall correct cartridge; verify compatibility
People Also Ask
Why does my printer print gray instead of true black?
Gray output is often caused by a clogged black nozzle, misconfigured grayscale settings, or a misread cartridge. Start with a nozzle check, cleaning cycle, and verify color settings in the driver. If the issue persists, inspect the cartridge contacts and replace the cartridge if needed.
Gray output usually means the black channel isn't firing properly. Run a nozzle check, clean the head, and ensure color printing is enabled in the driver.
My printer won’t recognize the black cartridge at all. What should I do?
Re-seat the cartridge and clean the contacts. If recognition still fails, check for firmware updates and reinstall the driver. Verify you’re using an authentic cartridge recommended for your printer model.
If the cartridge isn’t recognized, reseat it, check contacts, and update firmware and drivers. Use the recommended cartridge.
Can a clogged print head affect only black ink?
Yes. A partial clog can selectively affect black channels depending on the print head design. Run a nozzle check and cleaning cycles, and consider a deeper clean if available for your model.
A head clog can affect black ink. Try nozzle checks and cleaning, and consider a deeper clean if your model supports it.
Is it safe to use third-party ink to save money?
Third-party inks can void warranties and may not have proper color calibration, leading to poor results or clogs. Use OEM cartridges when needed, especially for critical black output.
Third-party ink might cause more issues and could void your warranty. Use OEM cartridges when possible.
How often should I run a nozzle check?
Run a nozzle check at least monthly if you print regularly, or whenever you notice faded or uneven output. This helps catch clogs early and maintain print quality.
Do a nozzle check at least once a month or when output looks faded to prevent clogs.
When should I contact support?
If you’ve followed the troubleshooting steps and still see no black, the issue may be a failing print head or internal hardware fault. Contact the manufacturer or a qualified technician with model, cartridge type, and a steps log.
If the issue persists after troubleshooting, contact support with details about your model and steps taken.
Watch Video
Quick Summary
- Check cartridge status first and reseat if needed
- Run nozzle checks and cleaning cycles promptly
- Verify driver settings and avoid mono mode when printing black
- Update firmware and use compatible cartridges for reliability