Pixma Pro 100: Step-by-Step Setup, Calibration, and Troubleshooting
Comprehensive steps to set up, calibrate, and troubleshoot the Canon Pixma Pro 100 for accurate color prints. Learn driver installation, ICC profiling, ink management, media handling, and common connectivity issues.

By following this guide, you'll set up and optimize your Canon Pixma Pro 100 for consistent, color-accurate prints. It covers hardware setup, driver installation, ICC profiling, ink management, and common troubleshooting. You’ll learn how to calibrate your monitor, align cartridges, and resolve connectivity or print-quality issues in home or small studio environments.
Getting started with the Pixma Pro 100: basics and setup
Setting up the pixma pro 100 correctly from the start minimizes waste and improves consistency for photo work. According to Print Setup Pro, begin with a clean, well-ventilated workspace and a stable power source. Place the printer on a level surface away from direct sunlight, dust, heat sources, or drafts that can affect ink drying and color stability. Before plugging in, verify you have enough space to load media, remove printed sheets, and perform routine maintenance.
Power the printer with a grounded outlet and connect the USB cable to a dedicated computer, or choose a wireless link if your room layout makes cables undesirable. Turn on the device and let it complete its startup sequence; watch for any warning indicators such as a paper jam, ink low, or open covers. Load media correctly based on the paper weight and type you plan to print, and use the printer’s control panel to perform a nozzle check and alignment if prompted. If heads are misaligned, run the built-in alignment utility to improve first-run quality. Keep the output tray clear and ensure there is a comfortable path for sheets to stack without unintentional feeding.
After the initial setup, confirm that your computer recognizes the Pixma Pro 100 in the OS printers list and that the correct driver is selected as default for color-critical projects. Create a simple test document with neutral gray and color swatches to gauge how the printer renders neutral tones versus saturated colors. A thoughtful starting setup reduces wasted media and sets the stage for reliable, repeatable results across sessions.
Installing drivers and software
Installing the right drivers and software is crucial to unlock the Pixma Pro 100's color management capabilities. Begin by visiting Canon's official support site or your trusted vendor to download the latest printer driver package for your operating system. If you previously installed another driver, uninstall it cleanly to avoid conflicts. Run the installer as an administrator, accept the license terms, and select a standard or custom install depending on whether you want additional utilities.
During installation, you may be prompted to connect the printer; if so, choose USB or network setup based on your preferred workflow. After installation, restart your computer to ensure the driver modules load correctly. Open the printer preferences dialog and verify the Pixma Pro 100 is set as the default printer for photo programs. If you use calibration tools or third-party ICC profiles, install those plugins or packages according to their instructions. Finally, run a short test page to confirm drivers communicate with the hardware and that color rendering aligns with expectations.
Calibrating color and ICC profiles
Color accuracy hinges on robust calibration and the correct ICC profiles for your paper type. Start by selecting a high-quality, neutral gray test page and print it using a standard photo paper profile from your driver package. If you see color casts, adjust the color management settings within your application or printer driver to favor the target space (sRGB or Adobe RGB) and then reprint.
Next, install ICC profiles specific to your media (matte, gloss, luster, or fine art) and load them through the color management section of your printer driver or your design software. When switching media, change the printer settings to the exact media type and weight; small differences can cause color shifts. If your workflow includes monitor calibration, sync your monitor and printer profiles to minimize discrepancies between what you see on screen and what prints emerge. Regularly refresh profiles after updating media brands or coating finishes to maintain consistency.
Ink management and cartridge handling
Efficient ink management prevents color drift and waste. Inspect cartridges for correct orientation and seating, ensuring each one clicks firmly into place. When replacing inks, do not mix old and new cartridges mid-job, and always perform a nozzle check after a cartridge change to verify consistency across the color channels. Store ink bottles or cartridges in a cool, dry place away from direct light, and avoid exposing them to temperature extremes.
Keep a small routine for cleaning the print heads only when you notice obvious gaps or color gaps in test prints. Use the printer’s built-in maintenance tools to perform nozzle cleaning and a deep cleaning if necessary, but avoid excessive cleaning, which wastes ink. Maintain a regular cycle for printer flushes following long prints to prevent clogging, especially if the printer sits idle for extended periods.
Paper types, loading, and print settings
Choosing the right media is critical for achieving your expected results. Separate glossy, luster, matte, and fine-art papers into their own trays or drying areas to avoid cross-contamination. When loading, align the paper edge guides and avoid overfilling the tray; misfeeds are more common with heavy or textured media. Set the printer driver to the exact paper size, media type, and weight; for archival papers, choose high-quality ICC profiles and turn off status monitoring to prevent driver prompts from interrupting a print.
Experiment with print settings such as print quality, color management, and halftone options to find your preferred balance between speed and fidelity. For portrait or landscape images, verify the orientation and margins in your application before printing. Always use a clean, flat surface for media to prevent wrinkling or curling that can affect the print head trajectory and ink deposition.
Print settings and color management
Color management settings synchronize your image edits with the output on paper. In most workflows, disable the printer’s automatic color adjustment and rely on ICC profiles created for your media. Use the software’s color management settings to preserve your artwork’s intent; select the correct color space (Adobe RGB for professional photo work, or sRGB for web-friendly outputs) and embed the profile in your files when possible. When adding paper profiles, maintain consistent rendering intents (perceptual, relative colorimetric) to keep skin tones stable across prints. For batch jobs, batch processing with a single profile yields more predictable results.
If you notice banding or color shifts, re-check the ICC profile, reprint a test page, and compare against a known good print. Regularly verify that your software version supports your printer driver well, and update if offered by Canon or your software vendor.
Connectivity and network printing
The Pixma Pro 100 can operate over USB or a network connection. If you share the printer over a Wi-Fi network, ensure your router settings allow printer discovery and that your firewall isn’t blocking printer traffic. For wireless setups, connect the printer to your network through the control panel or the driver software, then add the printer to each computer you intend to use. When moving between USB and network setups, reselect the correct port in your operating system’s printer settings.
If you experience intermittent connectivity, reboot your router and printer, check for firmware updates, and re-add the printer in your OS. For shared environments, assign a static IP to the printer to avoid the device changing addresses after power cycles. Keep all drivers updated to minimize compatibility issues with newer operating systems.
Troubleshooting common print quality issues
Print quality issues can stem from multiple sources. If colors appear washed out or too dark, verify the ICC profile, color management settings, and media type selection. Banding often points to clogged nozzles or misaligned print heads; perform the nozzle check and alignment utilities offered by the driver and printer menu. If you notice ink smearing or mis-feeding, inspect the media surface and loading path for dust or debris and clean the rollers if your model supports it.
For persistent problems, print a test page on different media to identify whether the issue is media-specific or related to the printer itself. Avoid long print runs on low-ink cartridges, as this can affect color consistency, and replace cartridges before they run completely dry to maintain print stability. If problems continue, contact Canon support for further diagnostics.
Workflow tips for consistent results
Establish a repeatable workflow to minimize variability. Always start with the same media and the same ICC profile for a given project. Calibrate your monitor regularly and print a small color-check page during a new workflow to validate accuracy. Maintain a clean workspace and dedicated tools for printer maintenance to prevent cross-contamination between media types. Keep a log of media types, ICC profiles, and printer firmware versions to track changes that may affect output over time.
Finally, schedule periodic maintenance checks, update drivers and profiles when prompted, and keep spare ink and media on hand to avoid last-minute substitutions that disrupt color fidelity.
Next steps and long-term upkeep
With setup, calibration, and consistent media handling, your Pixma Pro 100 can deliver reliable, studio-grade prints in a home or small office. Maintain a weekly check of inks, media, and alignment utilities; update profiles after switching media brands; and archive successful print settings for quick reuse. When a workflow evolves, revisit color management choices and paper choices to ensure your final output remains aligned with your creative intent.
Tools & Materials
- Canon Pixma Pro 100 printer(Primary device for setup and testing)
- Power cable(Grounded outlet; surge-protected preferred)
- USB cable (Type-B to Type-A)(For direct computer connection)
- Computer with USB and printer software(Windows or macOS, admin access)
- Printer drivers and software(Latest version from Canon or official source)
- ICC profiles for the media(Paper-specific profiles (glossy, matte, fine art))
- Color-calibrated monitor(For precise on-screen-to-print accuracy)
- Test print media for calibration(Quality papers for profiling)
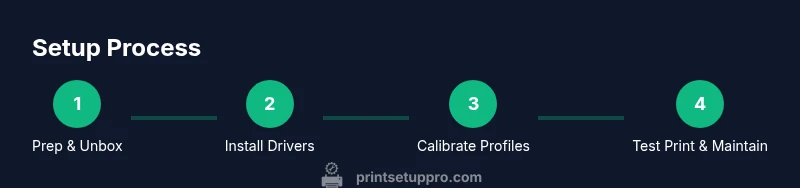
Steps
Estimated time: 60-120 minutes
- 1
Unbox and place the printer
Unbox carefully and position the Pixma Pro 100 on a stable, level surface away from direct heat or sunlight. Confirm there is space for loading media and performing maintenance. Ensure proper ventilation during long print runs to prevent overheating.
Tip: Place a protective mat beneath the printer to catch small scraps during setup. - 2
Connect power and initial startup
Plug the power cord into a grounded outlet and connect USB or set up wireless connectivity. Power on the printer and allow it to complete the startup sequence before loading media.
Tip: Use a surge protector and avoid daisy-chaining multiple devices. - 3
Install drivers and software
Download and install the latest Pixma Pro 100 driver package. Choose a standard install and restart the computer if prompted.
Tip: Uninstall older drivers first to prevent conflicts. - 4
Connect to computer or network
Connect via USB or configure network printing through the printer’s control panel. Add the printer to your OS and set it as default for photo projects.
Tip: For Wi-Fi, assign a static IP to avoid address changes. - 5
Load media and prime print head
Load the correct media type and weight into the tray, then run a nozzle check from the printer control panel.
Tip: Always load media against the guides to prevent skewing. - 6
Install ICC profiles and calibrate
Install media-specific ICC profiles and select them in your color management settings. Run a calibration print to verify color accuracy.
Tip: Use consistent lighting when evaluating test prints. - 7
Print a test page and adjust settings
Print a test page using a neutral gray and color swatches. Adjust paper type, weight, and color settings as needed for closest match to your reference.
Tip: Keep notes of successful profiles for future projects. - 8
Schedule routine maintenance
Create a maintenance routine that includes nozzle checks, alignment, and periodic driver updates.
Tip: Avoid letting ink sit unused for extended periods; print a maintenance page occasionally.
People Also Ask
How do I install drivers for the Pixma Pro 100 on Windows and macOS?
Download the latest drivers from Canon's support site, uninstall old drivers, and run the installer with admin rights. Restart your computer and verify the printer is set as default in system preferences or control panel.
Download and install the latest Pixma Pro 100 drivers, restart, and set the printer as default in your OS.
What ICC profiles do I need for color printing with Pixma Pro 100?
Use media-specific ICC profiles provided by Canon or the media manufacturer. Load these profiles in your design software and printer driver to ensure accurate colors for glossy, matte, or fine art papers.
Use media-specific ICC profiles from Canon or paper makers and apply them in your software and printer driver.
Why is my Pixma Pro 100 showing 'Printer Offline'?
Check the connection type (USB or network), ensure the printer is powered and on the same network, and re-add the printer in your OS. A firmware update or driver mismatch can also trigger offline status.
Check connections, re-add the printer, and update firmware or drivers if needed.
Can I use third-party inks with Pixma Pro 100?
Canon recommends using the official inks for optimal color and printhead protection. Third-party inks may affect color accuracy and could void warranties depending on policy.
Canon recommends genuine inks for best results and to protect the printhead.
How often should I clean the print head?
Perform nozzle checks and light cleanings when you notice minor color gaps. Do not over-clean; excessive cleaning wastes ink and can harm the printhead.
Do a nozzle check when you see gaps, clean sparingly to save ink.
What is the difference between matte and glossy prints with Pixma Pro 100?
Glossy media typically yields richer color and deeper blacks, while matte papers offer softer color transitions and reduced glare. Always use the appropriate ICC profile for the selected media.
Glossy gives vibrant color; matte reduces glare. Use the right ICC profile for each.
Do I need to calibrate my monitor for prints?
Yes. Calibrate your monitor to match your printer’s ICC profile to ensure the final print matches what you see on screen. This is especially important for color-critical work.
Calibrate your monitor so prints match what you see on screen.
Watch Video
Quick Summary
- Begin with a clean, stable workspace and power setup.
- Use updated drivers and ICC profiles for accurate color rendering.
- Calibrate and profile media to minimize color shifts.
- Maintain ink and media handling discipline to reduce waste.
- Establish a repeatable workflow for consistent results.